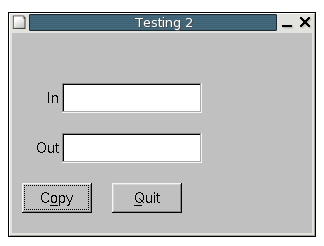
Okay let's analyse this improved version.
The first thing you will notice is that I have created a class called
SimpleWindow which is derived from an Fl_Window. However, I have
added public pointer members of all the widgets I want to add to my
window. Since these pointers are public I can access them outside of
the class if I need to. Now lets look at how callbacks are done in
classes.
private:
static
void cb_copy (Fl_Widget*, void*);
inline void
cb_copy_i ();
//----------------------------------------------------------------
void
SimpleWindow::cb_copy(Fl_Button* o, void* v) {
( (SimpleWindow*)v
)->cb_copy_i();
}
void
SimpleWindow::cb_copy_i() {
out->value ( inp->value() );
// Clean and simple
}
//----------------------------------------------------------------
These two functions are important. They go together. They are
the method for having member function callbacks. First I would like to
say that callbacks in a class can only be static.
In other words the THIS
pointer does not exist. The way to overcome
this is by having two functions. Where the simple static
function calls a second inlined member function of the class that DOES
have
the THIS pointer initialized. This second inlined function has the
actual callback code. Plus, don't forget, since the
second function is inlined
there really is only one function call. So there is no penalty for
making two functions.
Note the second function has an '_i' added to the
end of it to
denote that it's inlined. Also, the second inlined function doesn't
really need any input arguments as it already has access to everything.
Also, notice I don't have to put a pointer in front of
begin() or end()
or show() etc... in the constructor
as the THIS pointer is implicit.
Just in case you forgot about void*
in C++, here is a little refresher.
--------------------------------------------------------------
Brief info on Void
Pointers:
Some of you that are new to C++ may
have not seen void pointers
before. Basically, a void* is a pointer that can point to
anything. Usually pointers are typed, in other words, you know the type
of data to which they point.
But a void* has no type. We do some casting in the
callback function to deal with this issue.
From another perspective, pointers
usually know the size of the object
to which they are pointing. But void pointers don't, they just contain
the address. Therefore, one can never dereference a void*. Therefore,
we must utilize some casting to do the job.
--------------------------------------------------------------
In
the constructor of the SimpleWindow we use new to create an Fl_Button and then
we set the callback info of the Button in the line:
copy->callback
(cb_copy, this);
Now this line sets the static callback
function name and the userdata which is passed. I pass the address
of the class instance (the THIS pointer) as the userdata to the void*
of the callback function. Therefore, I have access to
the entire class in
the callback with only the tiny overhead of passing an address!! So
simple and powerful.
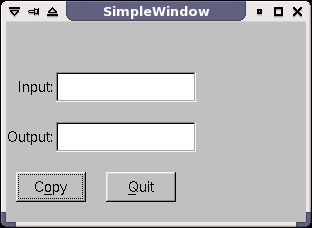
Get/Set methods
One aspect of FLTK which might take some getting use to is the get/set
functions. They both have the same name but are overloaded with respect
to their return and input parameters. Get functions have no input
parameter, so inp->value() gets
or returns the value of the widget (a const char* in this case). On the
other hand, out->value(const
char*) sets the value of the out
object. Also, compare how clean and efficient this sinlge line
of communication is compared to the two ugly lines in the first example
of talking widgets. No more messy counting children or casting. This is
a
consequence of making the wrapper class.
resizable(this);
This line allows the program window to
be resized. However, I could have just as easily called
resizable(copy) which would make the window resizable also. The
difference being that my copy button would have been the widget to
resize both horizontally and vertically. Whereas, in my case
everything in the window is resizeable. Remember only one widget per
group can be
resizable. So if you want a certain layout behavior you need to add
appropriate horizontal and vertical groups. This is copied
from fltk general newsgroup date Jan 17 2004.
Marc R.J. Brevoort wrote:
Here
are a few hints. Read them carefully
then try again. Good luck!
- to make things more predictable, it helps to fill groups with
widgets only in one direction: either horizontally or
vertically.
(this also helps explain the following hints).
- If you need to fill groups both horizontally and vertically,
fill a group WITH GROUPS in one direction, then those
'sub'groups
in the other direction.
- In a group, at most one widget can be set to "resizable".
Attempts to setting several widgets to 'resizable' causes
only the last one to be marked resizable.
- Setting a widget to "resizable" means that that widget can be
resized BOTH horizontally and vertically, not that it is the
only resizable widget in the group.
- all other widgets in the group may resize along proportionally to
the size of the group, but only in one direction (if the
group
is populated horizontally, 'nonresizable' widgets only
resize
vertically, only the 'resizable' widget resizes in both
directions.
- if a group is only resizable in one direction, only the resizable
widget will resize, all other widgets will stay the way
they are.
Hope this helps,
grtz
MRJB
Thank you Marc. I have printed this message and included it with my
FLTK documentation. It's a keeper.
Finally the last line to analyse is
hide();
// which calls hide() on the SimpleWindow
You can quit your programs in
one of two ways. One way is to call exit(0) and depend on your
operating system to free all allocated memory. The other is to
call hide() on all windows
which will cause Fl::run() to
return. Hence, SimpleWindow win
goes out of scope and its destructor is called normally. One imporatant
thing to keep in mind though is that
if you have global objects then using hide() may not be a good idea as
those objects will not have their destructors called since they were
not
created in the main function scope. But I personally don't like
declaring objects globally anyway. Note: calling exit(0) will not
return Fl::run() but all memory WILL
be freed by the OS.
Again be aware that I don't delete any of the dynamic objects
created of the class in the destructor. This is
because SimpleWindow is a sub-class of an Fl_Group and as such it has
all of it's children destroyed by the virtual base class destructor.
This is
possible since the base class has the ability to iterate through all
the children with child(int
n) and children().
Who needs Java when
you've got FLTK. ; )
Side note: I would like to post a bit of code Jason Bryan came up with
on FLTK general newsgroup.
void fl_exit()
{
while( Fl::first_window() )
Fl::first_window()->hide();
}
This little function should make sure that all windows hide, therebye,
ensuring that Fl::run() is returned and all destructors called
properly. Thanks Jason.
Events are what GUI programs respond to. In the FLTK docs they
are explained here.
However, I always like to learn by example so I coded a small
program to display almost every event. Here it is
#include <FL/Fl.H>
#include <FL/Fl_Window.H>
#include <FL/Fl_Button.H>
#include <iostream>
using namespace std;
class MyButton : public Fl_Button
{
static int count;
public:
MyButton(int x,int y,int w,int h,const
char*l=0)
:Fl_Button(x,y,w,h,l) {}
int handle(int e)
{
int ret =
Fl_Button::handle(e);
cout<<endl<<count++<<" ******** button
"<<label()<<" receives ";
switch(e)
{
case FL_PUSH:
cout<<"push"<<" event and returns:"<<ret<<endl;
break;
case FL_RELEASE:
cout<<"release"<<" event and
returns:"<<ret<<endl;
break;
case FL_ENTER:
color(FL_CYAN);
cout<<"enter"<<" event and returns:"<<ret<<endl;
redraw();
break;
case FL_LEAVE:
color(FL_BACKGROUND_COLOR);
cout<<"leave"<<" event and returns:"<<ret<<endl;
redraw();
break;
case FL_DRAG:
cout<<"drag"<<" event and returns:"<<ret<<endl;
break;
case FL_FOCUS:
cout<<"focus"<<" event and returns:"<<ret<<endl;
break;
case FL_UNFOCUS:
cout<<"unfocus"<<" event and
returns:"<<ret<<endl;
break;
case FL_KEYDOWN:
cout<<"keydown"<<" event and
returns:"<<ret<<endl;
break;
case FL_KEYUP:
if ( Fl::event_key() == shortcut() ){
box(FL_UP_BOX);
redraw();
ret=1; //return handled so keyup
event stops
} //being sent to
ALL other buttons unecessarily
cout<<"keyup"<<" event and
returns:"<<ret<<endl;
break;
case FL_CLOSE:
cout<<"close"<<" event and returns:"<<ret<<endl;
break;
case FL_MOVE:
cout<<"move"<<" event and returns:"<<ret<<endl;
break;
case FL_SHORTCUT:
if ( Fl::event_key() == shortcut() ){
box(FL_DOWN_BOX);
redraw();
}
cout<<"shortcut"<<" event and
returns:"<<ret<<endl;
break;
case FL_DEACTIVATE:
cout<<"deactivate"<<" event and
returns:"<<ret<<endl;
break;
case FL_ACTIVATE:
cout<<"activate"<<" event and
returns:"<<ret<<endl;
break;
case FL_HIDE:
cout<<"hide"<<" event and returns:"<<ret<<endl;
break;
case FL_SHOW:
cout<<"show"<<" event and returns:"<<ret<<endl;
break;
case FL_PASTE:
cout<<"paste"<<" event and returns:"<<ret<<endl;
break;
case FL_SELECTIONCLEAR:
cout<<"selectionclear"<<" event and
returns:"<<ret<<endl;
break;
case FL_MOUSEWHEEL:
cout<<"mousewheel"<<" event and
returns:"<<ret<<endl;
break;
case FL_NO_EVENT:
cout<<"no event"<<" and returns:"<<ret<<endl;
break;
}
return(ret);
}
};
int MyButton::count=0;
void but_a_cb(Fl_Widget* w, void* v){
cout <<endl<< "Button A
callback!"<<endl;
}
void but_b_cb(Fl_Widget* w, void* v){
cout <<endl<< "Button B
callback!"<<endl;
}
void but_c_cb(Fl_Widget* w, void* v){
cout <<endl<< "Button C
callback!"<<endl;
}
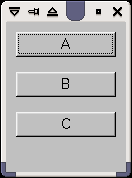
int main()
{
Fl_Window win(120,150);
win.begin();
MyButton but_a(10,10,100,25,"A");
but_a.shortcut('a');
but_a.callback(but_a_cb);
MyButton but_b(10,50,100,25,"B");
but_b.shortcut('b');
but_b.callback(but_b_cb);
MyButton but_c(10,90,100,25,"C");
but_c.shortcut('c');
but_c.callback(but_c_cb);
win.end();
win.show();
return(Fl::run());
}
Okay lets compile this program.
(for Linux)
g++ -I/usr/local/include -I/usr/X11R6/include -o events
events.cc -L/usr/X11R6/lib -L/usr/local/lib /usr/local/lib/libfltk.a
-lm -lXext -lX11 -lsupc++
or
(for Linux or Windows)
fltk-config --compile events.cc
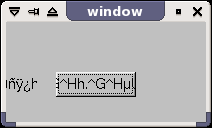
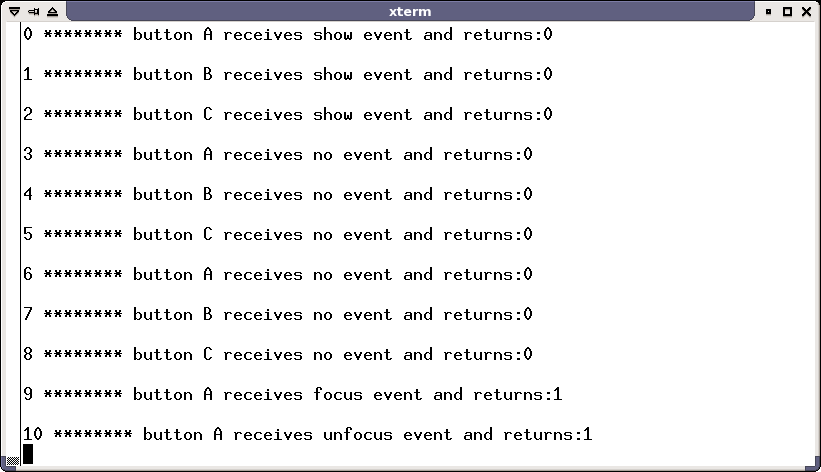
Here is what we get when we run it from a console (Note: Don't launch
the program from Dev-C++ since you won't see the console output) You
will need to use MSYS/MinGW in Windows or better yet use Linux.
Under Construction..............
More sections
to come in the future
As I learn more and more about FLTK I will add new sections to
this site.
I teach senior high school Physics and Computer Programming (C++ of
course) in
British Columbia, Canada. Programming is my hobby and passion. I
discovered FLTK in 2003 and I am really happy that Open Source/Free
Software like this exists. FLTK has opened up a whole new world of
programming possibilities. I would like to
thank the FLTK general newsgroup usual suspects like Bill, Mike, Matt,
Greg,
Jason, Marc, Alexey, Roman and Dejan. Sorry if I left anyone
out. You guys are what keeps FLTK alive and well. BRAVO!
Also please feel free to post comments, suggestions or rate
this site on the
FLTK
links/bazaar tutorial page
that links to this site. Or if you would
like to send me an email. Send it to
robark at gmail dot com
Robert Arkiletian


 Tutorial